How to Turn Off Hyphenation in InDesign By Default
May 28, 2024
How to Deselect in Photoshop – Mastering the Essential Skill with 3 Easy Steps
June 12, 2024It’s common to crop images to remove excess material that is not needed which is normally done in Photoshop or even Canva. Today, I’ll show you how to crop an image in Adobe Illustrator.
I’ll show you the two different methods you use to crop an image in Illustrator.
Method 1: Using the Crop Image Function
The first method to crop an image in Illustrator is by using the Crop Image function.
It will be worth noting that this method can only be used on images or photos. So using it on .jpg, .png, or any other rasterized format where the is made up of just one single layer then you will have no problem.
This method won’t work if you are using vector graphics or shapes that you have drawn. The technique you need for this is using the clipping mask method which I have explained further down.
Step 1: Place and Select Your Image
Open Illustrator and create a new artboard. Place your image on the artboard File > Place.
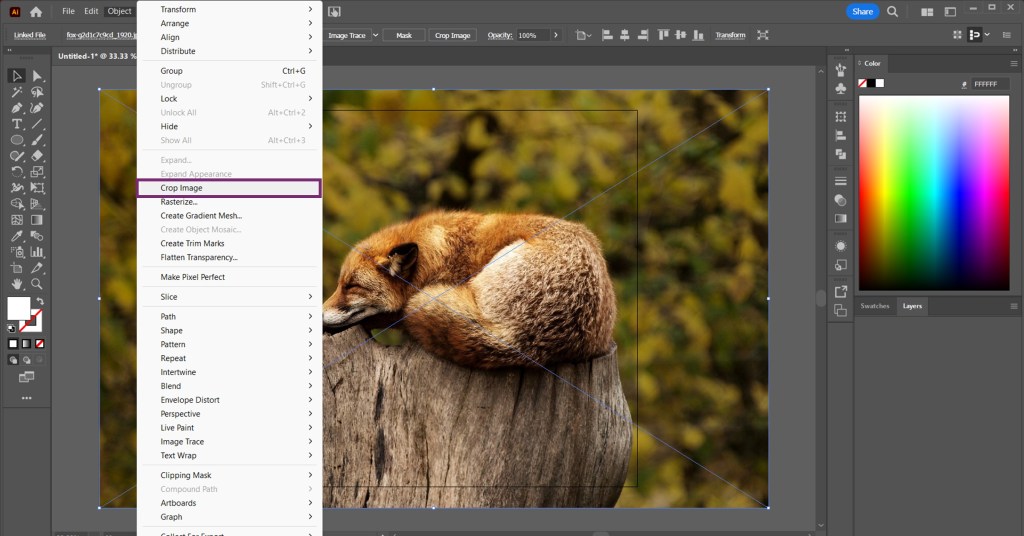
Once your image is on the artboard, move it around and position it so you make sure that the main part of the image (the fox in my example) is in the centre of the artboard boundaries.

If you want more of the background to be visible then don’t forget that you can resize the image. Use the Selection Tool (V) and Select the image, hold shift, and drag your cursor from one of the corners of the image to increase or decrease the size of the image.
Step 2: Crop An Image in Illustrator
To start make sure your image is still selected. To crop an image in Illustrator go to Object then Crop Image or you can click the Crop Image button at the top of the workspace.

Once clicked a warning pop-up will appear but click ‘OK’ on that to clear it.
A bounding box will appear around the image where you’ll be able to adjust which part of the image will be cropped. You can adjust the crop areas by dragging the corners and/or the sides to set the perfect crop area.

When you’re ready to crop the image you hit Enter on your keyboard or press the Apply button at the top of the workspace.
Method 2: Using A Clipping Mask in Illustrator
The second method to crop an image in Illustrator is by using the Clipping Mask method.
The clipping mask method is the best method if you want an image to crop or mask into a shape that isn’t just a rectangle or square.
The benefit of using a clipping mask is that you’ll be able to use it for both rasterized images and also vector graphics, unlike the Crop Image method.
Step 1: Draw your shape
Draw your shape by clicking on the Shape Tool (M). If you would like to use a different shape then click and hold on the Shape Tool and you will have more shape options appear.
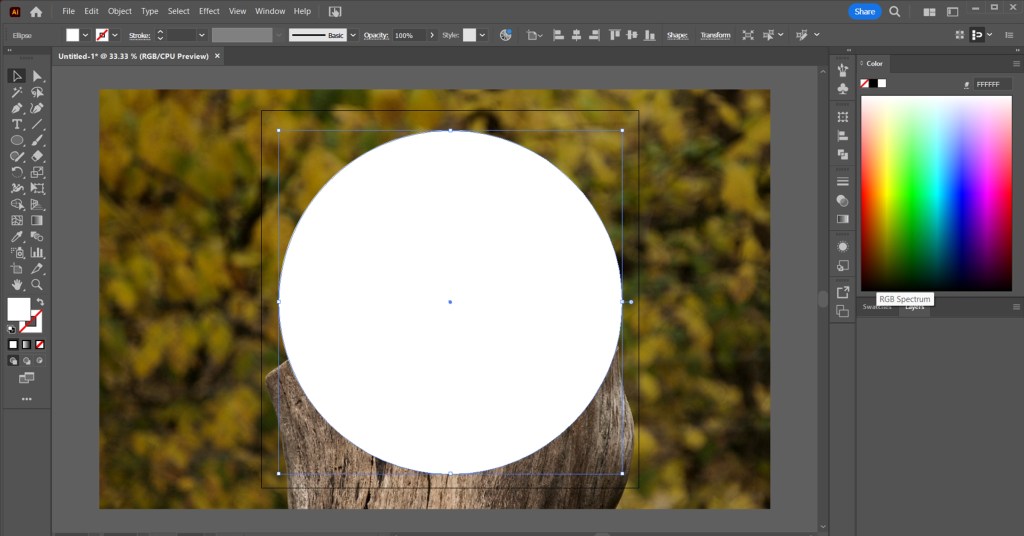
For this example, I will use the Ellipse Tool (L) to create a circle for my clipping mask.

Make sure to place your shape on top of the image placed on your artboard.
Step 2: Creating a Clipping Mask in Illustrator
Have the shape and image selected, this can be done by clicking on the image and holding Shift then selecting the shape at the same time.
You can also use the Selection Tools (V) click outside the image and shape and drag the cursor over the two elements so they are selected.
Soon as you’ve selected the image and shape you now want to make your clipping mask. Go to Object > Clipping Mask > Make or you can use the keyboard shortcuts Ctrl+7 for Windows or Cmd+7 for Mac.

Once you’ve clicked on Make your image will have cropped into the shape that you wanted.

Bonus Step: How to Release a Clipping Mask in Illustrator
If you want to undo a clipping mask and readjust the positioning of the shape or image. Just go to Object > Clipping Mask > Release or use the keyboard shortcuts Alt+Ctrl+7 for Windows or Cmd+Option+7 for Mac.

There you have it, these are the two best methods you can use to crop an image in Illustrator!
Final Thoughts
Both methods are great for cropping images in Illustrator. For me, I think using the clipping mask is the best method. You don’t need to worry about cropping too much of the background as you’ll easily be able to readjust the mask until you get it spot on.
It also doesn’t have the same restrictions as the Crop Image function does whereby you can only use it on a rasterized image.

