How To Flip A Layer In Photoshop
June 26, 2024
How To Lock A Layer In Photoshop In Seconds
July 10, 2024Artboards in Illustrator are a canvas where you can put all your designs and artwork on.
Sometimes, you’ll need more space on your canvas to create new versions of your designs. I’ll show you how to add artboards in Illustrator so you have more room for designing.
How to Add Artboards in Illustrator from a New File
Let’s start from the very beginning after you’ve opened Illustrator create a new file.
To create a new file. Click the New File button on the home screen or use the keyboard shortcut Ctrl+N for Windows or Cmd+N on a Mac.
A New Document box will appear, and this is where we’ll set up our new file with many artboards.

In the New Document box, you can adjust the width and height of your artboard and select the orientation. You’ll see a section labeled Artboards to the right of the orientation. Here, you can choose the number of artboards inserted into your document.
It’s worth noting that Illustrator does have a limit of a thousand artboards in one file. But I doubt you would need that many artboards!
Once you’re happy with the number of artboards you want, click Create.

How Do I Arrange My Artboards By Row or Column?
You can arrange you’re artboards in a row or column when creating a new document. Start by scrolling down on the document settings and clicking on More Settings.
A settings window will appear and you’ll see your options to arrange artboards in Illustrator.

How to Rearrange Artboards in Illustrator
Rearrange your artboards within an existing document and open the artboard panel. Do this by going to Window > Artboards or using the keyboard shortcut Shift+Ctrl+O for Windows or Shift+Cmd+O on a Mac.
The artboard panel will have an icon in the bottom left that looks a bit like a zigzag. Click that icon and you’ll be able to rearrange your artboards.

How to Add Artboards to Existing Illustrator Files
If you want to add artboards to an existing document, you can do so by navigating the Artboard panel. To open the Artboard panel, go to Window > Artboards or use the keyboard shortcut Shift+Ctrl+O for Windows or Shift+Cmd+O on a Mac.
In the Artboard panel, you’ll see a list of your current artboards. To add a new artboard, click on the plus icon located at the bottom right of the panel. After you’ve clicked this a new artboard will appear next to your existing artboard.

How to Duplicate an Artboard in Illustrator
To duplicate an artboard select the artboard in the Artboard panel and click on the Duplicate Artboard button.
To access this button click the 3 lines on the artboard panel on the top right, and a list of options will appear.
Select ‘Duplicate Artboards‘ and this will create a duplicate of your artboard.
To save time you can also copy and paste and this will duplicate your artboard next to your existing one.

How to Delete an Artboard
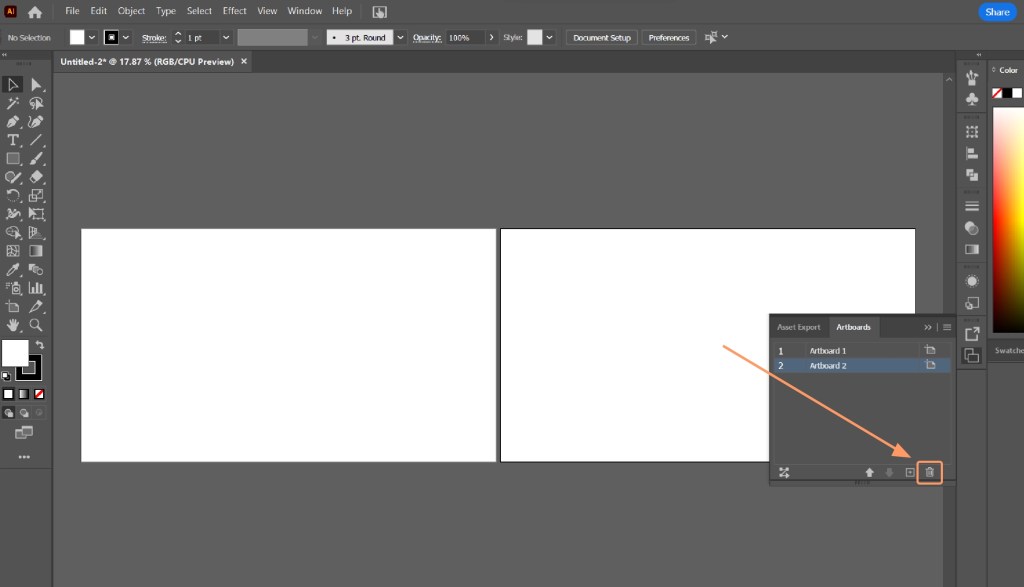
To delete an artboard, select the artboard in the Artboard panel and click on the bin icon in the bottom right.

You can also remove artboards by clicking on Document Setup then Edit Artboards. Select the artboard you want to remove and press the delete or backspace key on your keyboard.
There you have it, you’ve learned how to add artboards in Illustrator!
Bonus Tip
Here is a bonus tip from me. On the subject of artboards, you are not limited to the automatic positioning of the artboard. You can move the artboard wherever you like. Do this by going to Document Setup at the top of Illustrator and then clicking Edit Artboards. Select an artboard and you can move the artboard around.
This is a helpful tip if you want to change the order of your artboards.

