How To Lock A Layer In Photoshop In Seconds
July 10, 2024
Complete Guide on How to Make a Triangle in Illustrator
July 24, 2024I’ll never understand why, but learning how to add page numbers in InDesign always appears to be difficult to do, and if you’re here you must be feeling the same way.
Fear not, today you’ll know how simple the process of adding page numbers is; just as simple as riding a bike.
I struggled to get to grips with page numbers for years I would always forget how to do it, but now using this process I don’t even think twice about it.
In this tutorial, I’ll teach you how to add page numbers from start to finish. As well as showing you some of the best practices and advanced tips and tricks if you feel ready for it.
Preparing Your Document for Page Numbering in InDesign
Feel free to use your current document or create a new document, it’s up to you.
Create A Layer For Your Page Numbers
Firstly, create a new layer and label it ‘Page Numbers’. Move the layer at the top of the order so no other layer can overlap.

If you’ve never used layers before, there’s no need to worry. Layers are an effective way to keep all the elements in your document to be contained neatly. For example, you could have an images layer and only images are contained in that layer.
If you’d like to learn more about layers in InDesign read this help guide from Adobe.
How To Create A Layer
Go to the layer panel. To find the layer panel go to Window then Layers or press F7 on your keyboard.
Add a new layer by clicking the plus icon.

Rename the layer by double-clicking on the layer.
Using Parent Pages For Page Numbering
We’ll be placing the page numbers on the parent pages so they continuously flow throughout the document. This stops you from copying & pasting or inserting page numbers on every page you create.
What are Parent Pages in Adobe InDesign?
Parent pages formerly known as master pages act as a background that can be easily applied to multiple pages. Elements placed on a parent page will appear on every page that uses it.
Any changes made to a parent page are automatically reflected on all associated pages, typically including elements such as logos, page numbers, headers, and footers.
A dotted border always encloses elements from the parent page that are on the document pages.

If you want to learn more about parent pages Adobe has an insightful article on working with parent pages.
How to find and edit parent pages?
To locate parent pages you’ll need to go to the pages, commonly seen on the left in your toolbar.
If you can’t find it go to the Windows tab and click on Pages. Or use the shortcut F12.
From there you’ll see near the top of the panel you have two pages side-by-side (a spread) labeled as ‘A-Parent’.

Double click on that spread and a blank spread will appear on your screen and this is how you’ll be able to edit your parent pages and add page numbers.
Adding Page Numbers in InDesign
Let me show you how simple it is to add page numbers to your InDesign document.
Open and edit your ‘A-Parent’ page. Feel free to look at the previous section on the parent pages should you need to.
Using the Type Tool (T). Create a text box large enough to fit some numbers in.
Before you type anything into that text box right-click on the text box.
Navigate to Insert Special Character > Markers > Current Page Number.

You’ll then see an ‘A’ display in the text box.
If you wish to format your page number whether that be changing font size, colour, font type, etc. You’ll only be able to do it within the parent pages.

Close the parent pages by double-clicking on the first of your document in the pages panel.
Now the page number will display on your main document and will have changed from an ‘A’ to a ‘1’.

There have it, adding page numbers in InDesign is as simple as that!
If you wish to learn some advanced page numbering features in InDesign, continue reading.
Changing Page Number Styles
With page number styles you aren’t limited to just the standard 1,2,3 etc. InDesign offers a selection of different number styles you can use.
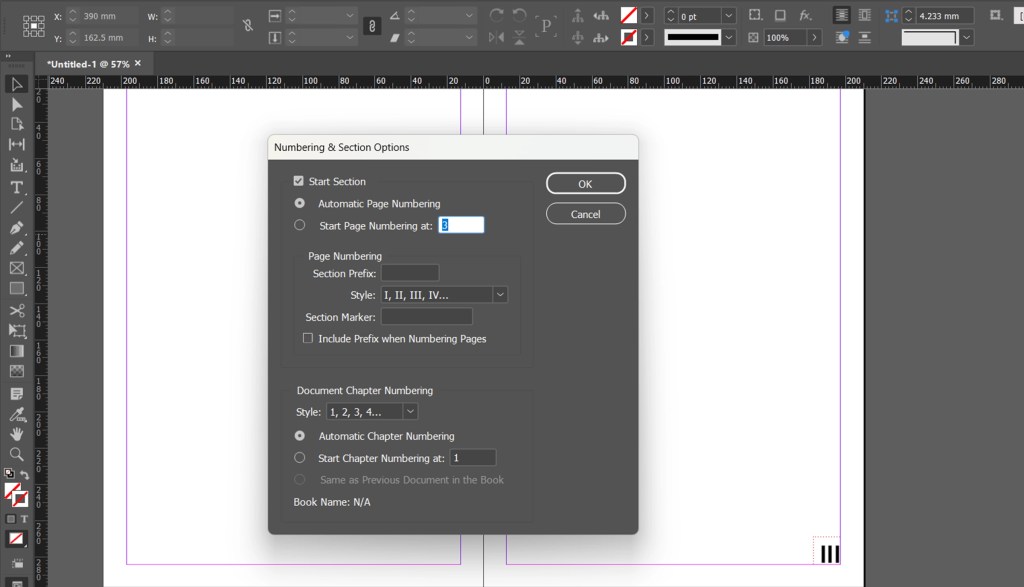
In the pages panel, click on the first page of your document, right-click, and select Numbering & Section Options.

To change the page numbering style click the Style drop down.

Once you’re happy with your numbering style click OK.
Section-Based Page Numbering
Depending on the type of document you’re creating in InDesign, you may want to section the numbering. This is a common practice when you number your front matter pages.
To start a new section select a page within your document that isn’t page 1. For this example, I’ll use page 5.
Select the page that you want to start the numbering from 1.
Right-click on the page and click on Numbering & Section Options.

Tick the Start Section and select the Start Page Numbering at option.

You can then change the style of your front matter pages to be different to the rest of the document.

Summary
That concludes the tutorial on how to add page numbers in InDesign.
To recap in this tutorial we’ve covered:
- The process of adding page numbers to an InDesign document.
- Using parent pages in InDesign
- Changing numbering styles
- Using sections in InDesign
If you’re facing any issues feel free to let me know on social media and I will help you.
Stay tuned for more Adobe tutorials every week!


